 Guest Pro Tip Archive Guest Pro Tip Archive
Back to the most recently posted Guest Pro Tip
Playing in the Present
by Michael Anthony
of The Mental Keys
The hardest thing to communicate to a golfer is the importance of changing their world view from outcome to process thinking because they have been conditioned from birth by society to judge their success from their results. It takes a leap of faith
to trust that perfecting the process, which includes staying in the present and not thinking, will produce the results one is striving to achieve. It's like trying to explain the "sound of one hand clapping."
Would you like to increase your concentration or keep from losing your focus during a round of golf? Would you like to play without fear or being nervous? Would you like to eliminate mental mistakes or mental collapses when you have the lead? Of
course you would. By training your mind to play in the present, you greatly increase your ability to do so.
Playing in the present is exactly what it is - the present. You are in the present when you are without any thoughts or concerns about the past or future. Nothing else exists except the present and the truth of your circumstances. Your past brought
you into the present and how well you do in the present will create your future. Any thoughts about the past or future take you out of the present and affect your ability to perform to your full potential in the moment, which is all you have.
Explaining the present is the easy part. The hard part is to fully REALIZE that the present is the only thing that matters because it is the only thing that exists. Everything else is just a fairy tale that exists in your imagination or desires.
Golfers with a strong mental game realize that the present is all that they can control. They have learned to play in the present without concern about the past or future outcomes. They realize the power of just being in the moment with the full
intention and expectation to accomplish their desires without attachment to the results. When they are at their best, they play on instinct and trust their subconscious or "it" to make it happen for them.
Learning to play in the present on instinct requires time and effort. That is why experience is such a priceless commodity. Because when all else fails, the truth emerges from one's experiences if you are honest with yourself. By training your mind to
play in the present, you can shorten the time required to experience the power of being free to play on instinct and in the zone. Unfortunately, many golfers never learn to stop dwelling on their past and future outcomes.
The trick to being in the present is to allow yourself to learn from the feedback each shot provides without your ego being involved in the outcome. By being honest about your present mechanical, strategic, physical and mental limitations, you will
increase your awareness of what you can do to improve your present abilities. Then, it becomes a question of how strong your desire is to make the necessary changes or adjustments to improve.
If you don't have the desire or time to do the work to improve, that's OK. Just make sure that you play in the present without thinking or concern about the outcome so you can get the most mileage from your present limitations. If you do, you will
shoot lower scores.
For more see Michael Anthony's excellent
Book and CD on improving your mental game.
Stretch your way to better golf!
Flexibility is the buzzword in the golf world! The more flexible a golfer is the better chance he/or she has at making an optimal backswing, and producing maximum clubhead speed. There is still some controversy over which flexibility exercises are the
best for golf and how often you should stretch. Knowing your limitations going into a stretching program is very important. If you have joint or muscle limitations, you should see your doctor before you start. Flexibility training should be done
consistently (daily) to obtain significant improvement. As we get older, flexibility becomes a greater issue when attempting recreational activities such as golf. Follow the guidelines I have written below, and you will get the most out of your
flexibility program, and play your best golf!
- Always Warm Up Before Stretching
A warm muscle is much more easily stretched than a cold muscle. Never stretch a cold muscle; always warm up first to get blood circulating throughout the body and into the muscles. A warm-up should be a slow, rhythmic exercise of
larger muscle groups done before an activity. Riding a bicycle or walking works well. This provides the body with a period of adjustment between rest and the activity. The warm-up should last about 5-10 minutes and should be similar to the activity
that you are about to do, but at a much lower intensity. Once you have warmed up at a low intensity for about 5-10 minutes and have gotten your muscles warm, you can now stretch.
- Stretch Before and After Exercise
We recommend stretching both before and after exercise, for different reasons. Stretching before an activity (after the warm-up) improves dynamic flexibility and reduces the chance of injury. Stretching after exercise or golf
ensures muscle relaxation and facilitates normal resting length, circulation to joint and tissue structures, and removal of unwanted waste products, thus reducing muscle soreness and stiffness. Body temperature is highest right after cardiovascular
exercise or after strength training. In order to achieve maximum results in range of motion and other benefits, it is highly recommended that you do static stretching at this point in your workout, just after your cardiovascular program and during or
after your strength-training program.
- Stretch Before Golf
Stretching before golf should be part of your warm-up. Active or dynamic stretching is crucial in preparing a golfer to perform at their best. Warming up first is essential. Your core body temperature should be raised to avoid
injury. This can be done by walking from your car to the practice range at a fast pace, thus preparing your body for active warm-ups specific to golf.
The shoulder joint is the most active joint in the golf swing. Movements such as arms circles
and crosses are needed to prepare for an aggressive golf swing on the first tee. The hamstrings and low back are also critical areas to warm up before swinging a club. Doing some easy toe touches (ease into it) with slightly bent knees will adequately
loosen up your lower back and hamstrings and provide more freedom in your golf swing.
- Stretch After Golf
Most golfers head for the clubhouse after the round. This is a crucial time for stretching because you have just put your body through a lot of stress. Spending only 5 minutes after the round doing static stretches will prevent a
lot of soreness and tightness. The areas to concentrate on are the low back, hamstrings, hips, and shoulders. If done consistently, you will be able to play or practice the next day with very few residual effects.
- Stretch Between Strength-Training Sets
To improve functional flexibility, we recommend stretching the muscle being worked in between strength-training sets. The benefit: maintaining and improving full range of motion while muscles are recovering. This is a very
time-efficient method because by the time you have gone through each of your strength-training exercises; you will have stretched each muscle without taking-up any more time.
Golfers are very concerned about losing flexibility from strength training. This is one way to ease your mind about maintaining full range of motion, even while strength training. Applying all of these principles will allow you the best chance at
improving your flexibility and ultimately your golf game!
Tip submitted by Golf Fitness Expert
Get his Golf Fitness e-book or
see Golf-Trainer for more detail on golf fitness.
Improve While You Sleep
by Michael Anthony
of The Mental Keys
When you go to sleep, your brain is very busy processing all the thoughts and actions that went on your "tape" during the day. It is preparing how to respond in the future. This fact makes sleeping one of the best times to improve your
golf and mental game.
Unfortunately, most golfers don't take advantage of this opportunity to get better and lower their score. Typically what happens after a round of golf, golfers get together and share their war stories about how they got robbed by old man golf and how
they should have shot a lower score. Then on the way home they talk to themselves about their bad shots or the score that they could or should have shot.
Rarely, do golfers take an honest look at how they played and use the feedback to find ways to improve. Unfortunately, they have trained their tapes to dwell on the negatives instead of making lemonade out of the lemons. As a result when they go to
sleep that night, their brains are busy processing this information so that their tapes will have them repeat the same scenario the next time they play.
Fortunately, you can reprogram your tape to change for the better since the last input on your tape has the biggest impact on your brain's responses. So instead of dwelling on the negatives that happened during your round of golf, start looking at
the feedback objectively for a way to improve.
If you don't do this, your tape is going to remember all the bad shots that you made and it's going to program itself to repeat all those bad shots the next time that you play. However, if you take the time to critique yourself and tell your tape how
to improve all those bad shots in your mind, while you are sleeping your brain will start telling your tape to get better the next time you play.
If you do this every time you play, you will be amazed at how much you can improve while you sleep. If you want help reprogramming your tape, listen to Part Two of my CD "Using The Mental Keys to Polish the Wheel" on your drive home or
before going to bed.
For more see Michael Anthony's excellent
Book and CD on improving your mental game.
Put blinders on to improve putting
by Sue Fiscoe, PGA and LPGA professional
See Sue's web page at PGAPros.com for more.
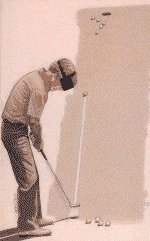 For those of you with putting problems, I've devised a drill for the practice green that can help you discover what you're doing wrong.
Determine a straight-in, flat putt. Stand at least 10 feet from the hole with eight to 10 balls. Set up and, imagining you are wearing blinders, stroke the ball toward the hole. Don't look up. Bring the next ball over and stroke it,
again without looking up. Do the same with the remaining balls.
You should see one of three results when you look at the hole: If the balls are around the hole, your stroke is both good and consistent; if the balls are clustered left or right, then you're probably lined up wrong; if the balls are scattered, your
stroke is inconsistent.
Your putting problem thus identified, you are ready to set about correcting it.
Tip submitted by Sue Fiscoe
See Sue's web page for more.
You can use visualization before you make a shot or after the shot. By using both approaches, you will greatly increase your ability to improve your golf and lower your score.
When you visualize before making a shot, don't limit yourself to just seeing where you want the ball to go. The key is your imagination. Use as many of your five senses as possible to vividly imagine the shot that you want to make. You not only want
to see the path of the ball to your target, you want to feel the power or softness of the club face striking the ball according to the particular shot you're attempting as well as hear the sound it will make.
Visualization works because your mind does not distinguish between what you actually experience and what you vividly imagine. This occurs because your brain records every moment of your entire life. We will call the recording process of your brain -
your tape, which is a conceptual representation of all your previous thoughts and actions. Your brain is programmed to make similar decisions each time you face similar circumstances according to what is on your tape. However, the most current
portion of your tape has the biggest impact on its decision making process.
By visualizing a shot before you attempt it, you are putting on your tape very specific instructions for your brain to follow instead of allowing it to choose from the good and bad shots that were previously recorded there. If you make a shot that
does not come off as well as you wanted or visualized, you can allow it to be recorded on your tape 'as is' to be replayed in the future. Or, you can take a couple of seconds to visualize the shot you wanted and put on your tape the shot you want the
next time the situation calls for it.
You can do this immediately after the shot or at night before you go to sleep. Ideally, you will do both. The reason this improves your golf is that when you sleep, your brain is reviewing and sorting the information you put on your tape that day so
it can decide what shot to select for you in the future. Would you prefer your brain to select the bad shot that you left 'as is' or the three good ones that you visualized?
It's your choice. If you take the time to visualize better golf shots, you will lower your score.
Tip submitted by Michael Anthony
See his web site and get his free newsletter for more.
Eliminating Back Pain from Your Golf Game
by Elizabeth Howzen Kais
of FloridaGolfConditioning.com
Rotating your body 180 degrees while generating enough force to accelerate a golf club can place a lot of stress on your back. Initially this stress may be experienced as an unusually high level of tiredness, also known as fatigue, at the conclusion
of a round or range session. If left alone this fatigue progresses to muscle aches, tissue tears and changes in the alignment of the spine. The key is to be both strong and flexible enough in the muscles to properly align the spine making the
rotation movement of the golf swing effortless.
The easiest area of misalignment to identify is the neck. Many golfers underestimate the importance of keeping the head centered between the shoulders. Every inch that the head moves forward of the midline increases the weight that upper back
ligaments and neck muscles support by 100 percent[1]. For example, if your head weighs 10 pounds and it moves one inch forward of the midline your upper back ligaments and neck muscles must now support 20 pounds. A head that is two inches forward
forces the back ligaments and neck muscles to support 30 pounds, and so on. Unfortunately this forward head posture is reinforced in our daily activities of working at a computer or desk and driving. This misalignment leads to headaches and pain
between the shoulder blades.
How can you determine proper head alignment on your own? With one hand place the shaft of a driver on your spine directly between your shoulder blades with the grip on the back of your head. You can steady the club by holding it at the clubface end
below your low back. Now take your address stance while continuing to hold the club shaft on your spine between the shoulder blades and on the back of the head. Place your flat, free hand on the back of your neck. Your hand should simultaneously
contact the club shaft and your neck in this position. If it only contacts your neck, your head is too far forward of the mid-line.
Correcting this misalignment involves two steps. First draw your chin straight back in toward your throat. Do not allow your chin to simultaneously move up or down, only straight back. Second, as you draw your chin straight back, elongate your neck
as if someone were pulling it straight out in line with the spine. Do not worry if you are unable to hold this position or are not able to contact the shaft of the club and the back of your neck at the same time when you first begin this exercise.
Pull the head back and elongate the spine as far as you can and hold the position for as long as you can maintain perfect form. With perfect practice your front neck muscles (deep cervical flexors) will become stronger and your back neck muscles
(cervical extensors) will stretch back to their normal length.
Low back pain occurs when there is too much or too little spine curve in the area between the ribs and the hips. This condition occurs when some muscles surrounding the low back, ribs and hips become too tight and shift the bones. This also causes
the opposing, balancing muscles to become loose and weak. Both conditions reduce low back rotation in the back swing and the follow through causing a short swing and an over all reduction in drive power. A golfer who attempts to improve their
rotation without addressing their abnormal lumbar curve can over stretch the mid-back and/or shoulder muscles and stabilizers causing damage to those bones and tissues (i.e. bone spurs or rotator cuff tears).
How can you determine proper low back alignment on your own? With one hand place the grip of a driver directly between your shoulder blades with the shaft bisecting your hips. The shaft will actually lie flat in contact with the sacrum, which sits
between the hip bones. You can steady the club by holding it on the shaft toward the clubface end below your low back. Now take your address stance while continuing to hold the club grip between the shoulder blades and bisecting the hips on the sacrum.
Place your flat, free hand on the middle of your low back. The flat hand should be positioned between the ribs and hips directly opposite the belly button. Your hand should simultaneously contact the club shaft and your low back spine in this
position. If it only contacts your low back spine, you have too much low back curve. If you cannot fit your flat hand between your low back spine and the club or if the club shaft rests flat on your spine from ribs to hips, you have too little low
back curve.
Correcting too much low back curve simply means stretching the tight muscles and tightening the stretched muscles. The tight muscles most commonly associated with too much low back curve are the erector spinae and the psoas. Rounding your mid to low
back like an angry cat, either standing or on hands and knees, while drawing your belly button in stretches the erector spinae. This muscle begins at the sacrum and hips and ends on the lower portion of the sixth and seventh ribs[2] and extends the
spine.
Lying face up flat on your back and bringing one knee into the chest while pressing the low back and straight, other leg into the floor stretches the psoas. It is critical that the low back and straight leg remain in contact with the floor. The
stretch occurs in the front hip area of the straight leg when the hips tilt as the opposite knee is pulled in toward the chest and the low back is pressed flat into the floor. The psoas begins at the low back (lumbar) spine and ends at the thigh bone
(femur)[3].
The stretched muscles most commonly associated with too much low back curve are the hamstrings and abdominals. Lying face down over a Swiss Ball (a large latex ball inflated to 55 to 65 cm) with your hands on the floor, draw the belly button in
toward the low back and raise the legs to parallel with the floor. This will strengthen the hamstrings. Turn face up so your whole spine is on the on the Swiss Ball and perform crunches to strengthen the abdominals.
Correcting too little low back curve simply means reversing the previous muscular information. In this situation the tight muscles most commonly associated with too little low back curve are the hamstrings and the abdominals. Assume your address
position with the club grip on your mid back and the shaft between your hips. Make a space for your hand by tipping your hips forward (toward the ground) and arching your low back. Draw your belly button in toward your spine for support. Be certain
that the club shaft remains in contact with the spine between the shoulder blades, the sacrum between the hips, and your hand. You will feel a stretch at the top of the back of your leg just below the hips and sacrum. The hamstrings begin at the
base of the hips on the back side of the leg and ends just below (Semimembranosus and Semitendinosus) the knee and just above (Biceps Femoris) the knee.
Lying face down with the hands under the shoulders and straightening the arms while keeping the hips on the ground stretches the abdominals. It is critical that the hips remain on the floor and the shoulders remain as far away from the ears as
possible when the arms extend. The rectus abdominis begins at the front of the hips and ends at the fifth, sixth and seventh ribs and the xiphoid process of the sternum[4].
The stretched muscles most commonly associated with too much low back curve are the hip flexors (psoas and quadriceps) and trunk extensors (erector spinae). Sitting down and standing up strengthen the hip flexors. Assume your address position with
the club grip on your mid back and the shaft between your hips. Make a space for your hand by tipping your hips forward (toward the ground) and arching your low back. Draw your belly button in toward your spine for support. Be certain that the club
shaft remains in contact with the spine between the shoulder blades, the sacrum between the hips, and your hand. Now bend your knees and hips more as if you were going to sit down on a chair. Only lower down as far as you can keeping contact with
the stick, your knees tracking to but not beyond your second toe, and your feet flat on the floor. Then stand all the way up keeping the same perfect form.
Lying face down on the floor with your fingertips at your ears and lifting the torso as high as possible off the floor strengthens the low back extensors (erector spinae).
Always remember that you are a unique individual with specific needs. Be sure to consult your physician prior to starting any new activities. The health and fitness industry is not regulated by any federal or state government agency. Only seek
exercise advice from certified and degreed practitioners.
Elizabeth Howzen Kais has a Masters of Education, Health and Physical Education from The College of New Jersey. She is a C.H.E.K-Certified Golf Biomechanic and Level 1 Practitioner, NCSF certified Personal Trainer and Primary Certification
Instructor, a Master Member of IDEA (since 1991) and an American Council on Exercise Group Exercise Instructor (since 1990). She is a strength and conditioning consultant for golfers in south Florida.
[1] Chek, Paul, Scientific Back Training, The CHEK Institute, Encinitas, CA, 1993, p.18.
[2] Kendall, Florence Peterson, Et. Al., Muscles Testing and Function, Lippincott, Williams and Wilkins, Philadelphia, PA, 1993, p. 138.
[3] Kendall, Florence Peterson, Et. Al., Muscles Testing and Function, Lippincott, Williams and Wilkins, Philadelphia, PA, 1993, p. 214.
[4] Kendall, Florence Peterson, Et. Al., Muscles Testing and Function, Lippincott, Williams and Wilkins, Philadelphia, PA, 1993, p. 147.
A Straight Stroke
by Geoff Magnum
of The Putting Zone
To make a straight stroke it helps to know how your body transmits forces into your hands
without you being aware of it. These forces encourage shifting the putterface out of
alignment as well as moving the putterhead back and through out of the desired stroke
path and altering your grip pressure. The relationship of the shoulders and arms causes
the problem. Here's how to spot these unwanted forces and what to do about them.
Allow your hands to hang the same way they hang when you putt, with the fingertips of
each hand facing but not touching each other -- just barely apart. Make your backstroke
for an imaginary putt of ten to twenty feet. Did your rear hand move a bit inside of
the fingers of your lead hand? Did the height of your fingertips above the ground become
uneven, with one hand's fingertips lower than the other's?
These two motions in the hands -- revealed by the changes in the hand positions -- affect
nearly all golfers, and next to no one is aware of the problem. Just because you have
your hands on the putter grip, these forces don't go away -- they still twist the face
out of square and send the putterhead off the stroke path and cause changes in your grip
pressure. All of this wreaks havoc with putting accuracy and consistency.
Here's the cure: Keep the center of your grip and the center of your stroke pivot (near
the clavicle or collar bone at the base of your neck) in line with each other throughout
the stroke, as they are at the beginning when you address the putt. The best way to do
this is to start the stroke with a push down and back of the lead shoulder, keeping your
putting system of arms and hands in the same shape. Think of keeping the putter shaft and
top of the putter handle pointing into the pivot during the stroke. This way, the
biomechanics of your stroke do not affect the arms or hands to any degree, and the
putterface stays square to your stroke path, the stroke path stays the way you intended
it, and your grip pressure doesn't need to alter mid-stroke.
Give it a try. Loren Roberts and other top pros use this approach, and so should you!
Geoff Mangum
The Putting Zone
http://hometown.aol.com/puttmagic
The World's most comprehensive putting resource.
Back to the most recently posted Guest Pro Tip
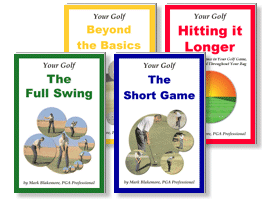
For more detail on these topics and the rest of the game get the "Your Golf" books --
a 4-volume series of paperbacks covering the entire game in detail.
|
